
毫秒镜像
 毫秒镜像
毫秒镜像木雷坞 · MLIEV
It is recommended to use the following project structure:
.
├──src
│  ├──main
│  │  ├──index.ts
│  │  └──...
│  ├──preload
│  │  ├──index.ts
│  │  └──...
│  └──renderer    # with vue, react, etc.
│     ├──src
│     ├──index.html
│     └──...
├──electron.vite.config.ts
├──package.json
└──...
With this convention, electron-vite can work with minimal configuration.
When running electron-vite, it will automatically find the main process, preload script and renderer entry ponits. The default entry points:
<root>/src/main/{index|main}.{js|ts|mjs|cjs}<root>/src/preload/{index|preload}.{js|ts|mjs|cjs}<root>/src/renderer/index.htmlIt will throw an error if the entry points cannot be found. You can fix it by setting the build.rollupOptions.input option.
See the example in the next section.
Even though we strongly recommend the project structure above, it is not a requirement. You can configure it to meet your scenes.
Suppose you have the following project structure:
.
├──electron
│  ├──main
│  │  ├──index.ts
│  │  └──...
│  └──preload
│     ├──index.ts
│     └──...
├──src   # with vue, react, etc.
├──index.html
├──electron.vite.config.ts
├──package.json
└──...
Your electron.vite.config.ts should be:
import { defineConfig } from 'electron-vite'
import { resolve } from 'path'

export default defineConfig({
  main: {
    build: {
      rollupOptions: {
        input: {
          index: resolve(__dirname, 'electron/main/index.ts')
        }
      }
    }
  },
  preload: {
    build: {
      rollupOptions: {
        input: {
          index: resolve(__dirname, 'electron/preload/index.ts')
        }
      }
    }
  },
  renderer: {
    root: '.',
    build: {
      rollupOptions: {
        input: {
          index: resolve(__dirname, 'index.html')
        }
      }
    }
  }
})
NOTE
By default, the renderer's working directory is located in src/renderer. In this example, the renderer root option should be set to '.'.
Preload scripts are injected before a web page loads in the renderer. To add features to your renderer that require privileged access, you can define global objects through the contextBridge API.
The role of preload scripts:
ipcMain and ipcRenderer modules for inter-process communication (IPC).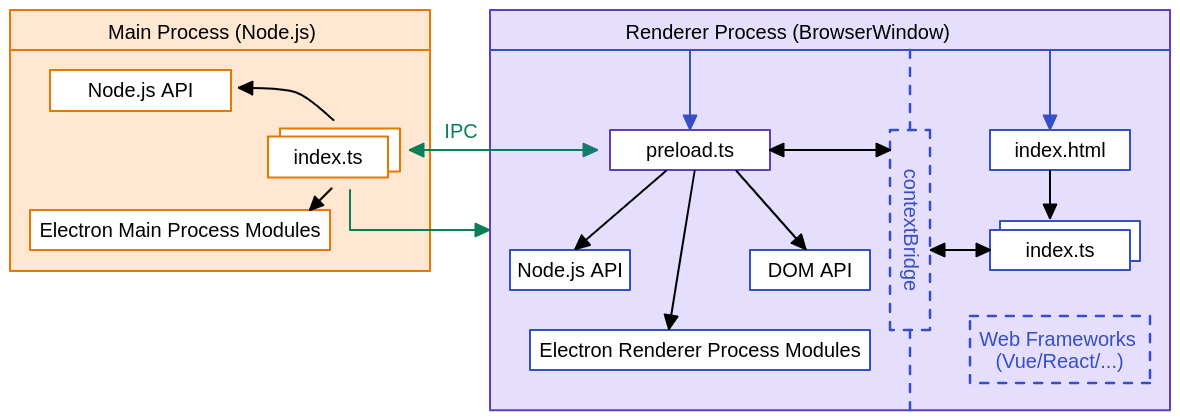
Learn more about preload scripts.
Create a preload script to expose functions and variables into renderer via contextBridge.exposeInMainWorld.
To attach this script to your renderer process, pass its path to the webPreferences.preload option in the BrowserWindow constructor.
Use exposed functions and variables in the renderer process.
import { contextBridge, ipcRenderer } from 'electron'

contextBridge.exposeInMainWorld('electron', {
  ping: () => ipcRenderer.invoke('ping')
})import { app, BrowserWindow } from 'electron'
import path from 'path'
const createWindow = () => {
const win = new BrowserWindow({
webPreferences: {
preload: path.join(__dirname, 'preload.js'),
},
})
ipcMain.handle('ping', () => 'pong')
win.loadFile('index.html')
}
app.whenReady().then(() => {
createWindow()
})const func = async () => {
const response = await window.electron.ping()
console.log(response) // prints out 'pong'
}
func()From Electron 20 onwards, preload scripts are sandboxed by default and no longer have access to a full Node.js environment. Practically, this means that you have a polyfilled require function (similar to Node's require module) that only has access to a limited set of APIs.
| Available API | Details |
|---|---|
| Electron modules | Only Renderer Process Modules |
| Node.js modules | events, timers, url |
| Polyfilled globals | Buffer, process, clearImmediate, setImmediate |
In sandbox mode, if you require or import other modules in a preload script, you may encounter the following error:
Unable to load preload scripts -> Error: module not found: 'foo'
To handle dependencies correctly, you have two options:
Disable sandbox
Fully bundle dependencies with electron-vite
Include all required modules in the build output so that preload scripts can access them at runtime. For more information, refer to the Dependency Handling and Isolated Build sections.
In Electron, renderer sandboxing can be disabled on a per-process basis with the sandbox: false preference in the BrowserWindow constructor.
const win = new BrowserWindow({
  webPreferences: {
    sandbox: false
  }
})
Learn more about Electron Process Sandboxing.
For development efficiency, it is recommended to use @electron-toolkit/preload. It provides an easy way to expose Electron APIs (ipcRenderer, webFrame, process) to the renderer process.
First, use contextBridge to expose Electron APIs into renderer only if context isolation is enabled, otherwise just add to the DOM global. Then, use the Electron APIs directly in the renderer process.
import { contextBridge } from 'electron'
import { electronAPI } from '@electron-toolkit/preload'

if (process.contextIsolated) {
  try {
    contextBridge.exposeInMainWorld('electron', electronAPI)
  } catch (error) {
    console.error(error)
  }
} else {
  window.electron = electronAPI
}// Send a message to the main process with no response
window.electron.ipcRenderer.send('electron:say', 'hello')
// Send a message to the main process with the response asynchronously
window.electron.ipcRenderer.invoke('electron:doAThing', '').then(re => {
console.log(re)
})
// Receive messages from the main process
window.electron.ipcRenderer.on('electron:reply', (_, args) => {
console.log(args)
})Learn more about @electron-toolkit/preload.
IPC SECURITY
The safest way is to use a helper function to wrap the ipcRenderer call rather than expose the ipcRenderer module directly via context bridge.
The easiest way to attach a preload script to a webview is through the webContents will-attach-webview event handler.
mainWindow.webContents.on('will-attach-webview', (e, webPreferences) => {
  webPreferences.preload = join(import.meta.dirname, '../preload/index.js')
})
nodeIntegration electron-vite does not support nodeIntegration. We recommend using preload scripts and avoiding Node.js modules in the renderer, which is the best practice adopted by most popular Electron applications. If you do need to use this feature, you must manually add polyfills for support (e.g., using plugins like vite-plugin-commonjs-externals).
When your electron app has multiple windows, it means there are multiple html files or preload files. You can modify your config file like this:
export default {
  main: {},
  preload: {
    build: {
      rollupOptions: {
        input: {
          browser: resolve(__dirname, 'src/preload/browser.js'),
          webview: resolve(__dirname, 'src/preload/webview.js')
        }
      }
    }
  },
  renderer: {
    build: {
      rollupOptions: {
        input: {
          browser: resolve(__dirname, 'src/renderer/browser.html'),
          webview: resolve(__dirname, 'src/renderer/webview.html')
        }
      }
    }
  }
}
How to Load Multi-Page
Check out the Using HMR section for more details.
You can append a -- after the electron-vite CLI with the arguments to be passed.
"scripts": {
  "dev": "electron-vite dev -- --trace-warnings"
}
NOTE
electron-vite already supports --inspect, --inspect-brk, --remote-debugging-port and --no-sandbox commands, so you don't need to do this for these commands. See Command Line Interface for more details.
"scripts": {
  "dev": "electron-vite dev -- p1 p2"
}
All arguments after the double-dash will be passed to Electron application, and you can use process.argv to handle them.
A node worker can be directly imported by appending ?modulePath or ?nodeWorker to the import request.
?modulePath suffix will be the worker bundle path. This syntax leans closer to the standards and is the recommended way to create node workers.import { resolve } from 'node:path'
import { Worker } from 'node:worker_threads'
import workerPath from './worker?modulePath'
new Worker(workerPath, {})?nodeWorker suffix will be a node worker constructor.import createWorker from './worker?nodeWorker'
createWorker({ workerData: 'worker' })
.on('message', (message) => {
console.log(`Message from worker: ${message}`)
})
.postMessage('')electron-vite supports using Electron UtilityProcess API or Node.js child_process to fork a child process. The child process can be imported with ?modulePath suffix.
import { utilityProcess, MessageChannelMain } from 'electron'
import forkPath from './fork?modulePath'

const { port1, port2 } = new MessageChannelMain()
const child = utilityProcess.fork(forkPath)
child.postMessage({ message: 'hello' }, [port1])

port2.on('message', (e) => {
  console.log(`Message from child: ${e.data}`)
})
port2.start()
port2.postMessage('hello')process.parentPort.on('message', (e) => {
const [port] = e.ports
port.on('message', (e) => {
console.log(`Message from parent: ${e.data}`)
})
port.start()
port.postMessage('hello')
})Electron supports ES modules beginning in Electron 28. electron-vite 2.0 also supports using ESM to develop and build your Electron applications.
We should first know the limitations of ESM in Electron:
unsandboxed and the file end with the .mjs extension.Learn more about ES Modules (ESM) in Electron.
There are two ways to enable ESM for electron-vite:
Adding "type": "module" to the nearest package.json.
When using this way, the main process and preload scripts will be bundled as ES module files. Note that preload script files end with the .mjs extension. You need to fix the file names that reference these preload scripts in your code.
Setting build.rollupOptions.output.format to es in config file.
export default defineConfig({
  main: {
    build: {
      rollupOptions: {
        output: {
          format: 'es'
        }
      }
    }
  },
  preload: {
    build: {
      rollupOptions: {
        output: {
          format: 'es'
        }
      }
    }
  }
  // ...
})
When using this way, the main process and preload scripts will be bundled as ES module files and end with the .mjs extension. You need to fix the main field (Electron entry point) in package.json and the file names that reference these preload scripts in your code.
In addition, since electron-vite 2.0, you can use "type": "module" in package.json even though Electron is lower than 28. In this case, the main process and preload scripts will be bundled as CommonJS files and end with the .cjs extension.
Before this, we have been using CommonJS as the build format. We might run into some NPM packages that do not support CommonJS, but we can bundle them through electron-vite to support Electron. Similarly, when we migrate to ESM, we will also run into some problems.
Importing CommonJS Modules from ES Modules
import { autoUpdater } from 'electron-updater' // ❌ SyntaxError: Named export 'autoUpdater' not found.In the above example, we will get a SyntaxError. However, it is still possible to import CommonJS modules from ES Modules by using the standard import syntax. If the module.exports object is provided as the default export or an export is defined using Object.defineProperty, the named imports will not work, but the default import will.
import updater from 'electron-updater' // ✅Differences between ES modules and CommonJS
import { BrowserWindow } from 'electron'
import { join } from 'path'
const mainWindow = new BrowserWindow({
webPreferences: {
preload: join(__dirname,'../preload/index.mjs') // ❌ ReferenceError: __dirname is not defined
}
})In ESM, some important CommonJS references are not defined. These include require, require.resolve, __filename, __dirname, etc. See Node.js's Differences between ES modules and CommonJS for more details.
import { BrowserWindow } from 'electron'
import { fileURLToPath } from 'url'
const mainWindow = new BrowserWindow({
webPreferences: {
preload: fileURLToPath(new URL('../preload/index.mjs', import.meta.url)) // ✅
}
})It is very important that electron-vite is compatible with some CommonJS syntax (include require, require.resolve, __filename, __dirname), and there is no need to fix these syntax problems during migration. However, we still recommend using ESM syntax in new projects.
electron-vite has made some compatibility with ES Modules and CommonJS syntax, allowing developers to freely switch between the two syntaxes with minimal migration work. But it should be noted that Source Code Protection currently only supports CommonJS.
